Manage cluster with GitOps
GitOps Support (optional)
EKS Anywhere supports a GitOps workflow for the management of your cluster.
When you create a cluster with GitOps enabled, EKS Anywhere will automatically commit your cluster configuration to the provided GitHub repository and install a GitOps toolkit on your cluster which watches that committed configuration file. You can then manage the scale of the cluster by making changes to the version controlled cluster configuration file and committing the changes. Once a change has been detected by the GitOps controller running in your cluster, the scale of the cluster will be adjusted to match the committed configuration file.
If you’d like to learn more about GitOps, and the associated best practices, check out this introduction from Weaveworks .
NOTE: Installing a GitOps controller needs to be done during cluster creation. In the event that GitOps installation fails, EKS Anywhere cluster creation will continue.
Supported Cluster Properties
Currently, you can manage a subset of cluster properties with GitOps:
Management Cluster
Cluster:
workerNodeGroupConfigurations.countworkerNodeGroupConfigurations.machineGroupRef.name
WorkerNodes VSphereMachineConfig:
datastorediskGiBfoldermemoryMiBnumCPUsresourcePooltemplateusers
Workload Cluster
Cluster:
kubernetesVersioncontrolPlaneConfiguration.countcontrolPlaneConfiguration.machineGroupRef.nameworkerNodeGroupConfigurations.countworkerNodeGroupConfigurations.machineGroupRef.nameidentityProviderRefs(Only forkind:OIDCConfig,kind:AWSIamConfigis immutable)
ControlPlane / Etcd / WorkerNodes VSphereMachineConfig:
datastorediskGiBfoldermemoryMiBnumCPUsresourcePooltemplateusers
OIDCConfig:
clientIDgroupsClaimgroupsPrefixissuerUrlrequiredClaims.claimrequiredClaims.valueusernameClaimusernamePrefix
Any other changes to the cluster configuration in the git repository will be ignored. If an immutable field has been changed in a Git repository, there are two ways to find the error message:
- If a notification webhook is set up, check the error message in notification channel.
- Check the Flux Kustomization Controller log:
kubectl logs -f -n flux-system kustomize-controller-******for error message containing text similar toInvalid value: 1: field is immutable
Getting Started with EKS Anywhere GitOps
In order to use GitOps to manage cluster scaling, you need a couple of things:
- A GitHub account
- A cluster configuration file with a
GitOpsConfig, referenced with agitOpsRefin your Cluster spec - A Personal Access Token (PAT) for the GitHub account , with permissions to create, clone, and push to a repo
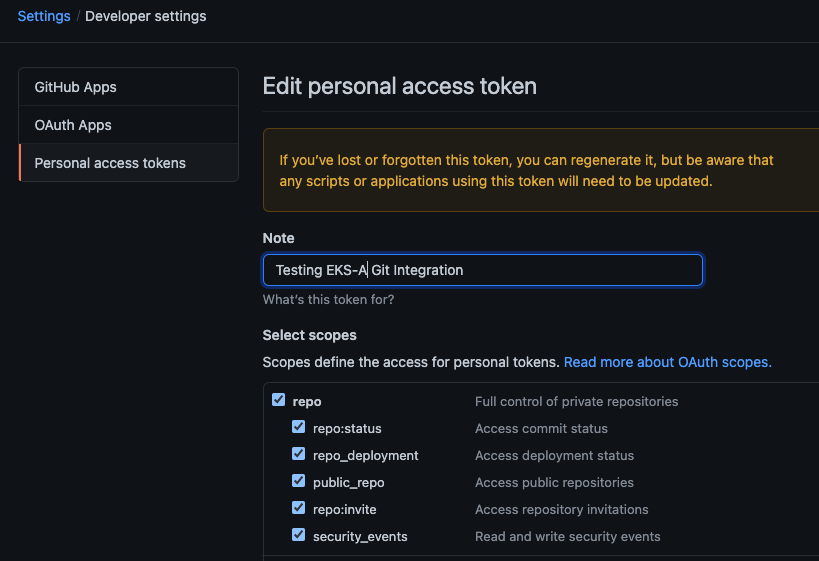
Create a GitHub Personal Access Token
Create a Personal Access Token (PAT)
to access your provided GitHub repository.
It must be scoped for all repo permissions.
NOTE: GitOps configuration only works with hosted github.com and will not work on a self-hosted GitHub Enterprise instances.
This PAT should have at least the following permissions:
NOTE: The PAT must belong to the
ownerof therepositoryor, if using an organization as theowner, the creator of thePATmust have repo permission in that organization.
You need to set your PAT as the environment variable $EKSA_GITHUB_TOKEN to use it during cluster creation:
export EKSA_GITHUB_TOKEN=ghp_MyValidPersonalAccessTokenWithRepoPermissions
Create GitOps configuration repo
If you have an existing repo you can set that as your repository name in the configuration.
If you specify a repo in your GitOpsConfig which does not exist EKS Anywhere will create it for you.
If you would like to create a new repo you can click here
to create a new repo.
If your repository contains multiple cluster specification files, store them in sub-folders and specify the configuration path in your cluster specification.
In order to accommodate the management cluster feature, the CLI will now structure the repo directory following a new convention:
clusters
└── management-cluster
    ├── flux-system
    │   └── ...
    ├── management-cluster
    │   └── eksa-system
    │       └── eksa-cluster.yaml
    ├── workload-cluster-1
    │   └── eksa-system
    │       └── eksa-cluster.yaml
    └── workload-cluster-2
        └── eksa-system
            └── eksa-cluster.yaml
By default, Flux kustomization reconciles at the management cluster’s root level (./clusters/management-cluster), so both the management cluster and all the workload clusters it manages are synced.
Example GitOps cluster configuration
apiVersion: anywhere.eks.amazonaws.com/v1alpha1
kind: Cluster
metadata:
  name: mynewgitopscluster
spec:
... # collapsed cluster spec fields
# Below added for gitops support
  gitOpsRef:
    kind: GitOpsConfig
    name: my-cluster-name
---
apiVersion: anywhere.eks.amazonaws.com/v1alpha1
kind: GitOpsConfig
metadata:
  name: my-cluster-name
spec:
  flux:
    github:
      personal: true
      repository: mygithubrepository
      owner: mygithubusername
Create a GitOps enabled cluster
Generate your cluster configuration and add the GitOps configuration. For a full spec reference see the Cluster Spec reference .
NOTE: After your cluster has been created the cluster configuration will automatically be committed to your git repo.
-
Create an EKS Anywhere cluster with GitOps enabled.
CLUSTER_NAME=gitops
eksctl anywhere create cluster -f ${CLUSTER_NAME}.yaml
Test GitOps controller
After your cluster has been created, you can test the GitOps controller by modifying the cluster specification.
-
Clone your git repo and modify the cluster specification. The default path for the cluster file is:
clusters/$CLUSTER_NAME/eksa-system/eksa-cluster.yaml -
Modify the
workerNodeGroupsConfigurations[0].countfield with your desired changes. -
Commit the file to your git repository
git add eksa-cluster.yaml git commit -m 'Scaling nodes for test' git push origin main -
The flux controller will automatically make the required changes.
If you updated your node count, you can use this command to see the current node state.
kubectl get nodes